

Monday, June 22, 2015
Hang On!

We're baaaack! In Bloomington, that is. After 3 years in Florida, we decided to head back to the Midwest. I know, I know. Why would anyone leave the sunny weather and lakeside living? I get asked this question a lot; our answer isn't that clean cut as "for a job" or "to raise a family".
The truth is, we missed the people. We missed our families. We missed that Midwestern hospitality that everyone hears about (and until you leave, you don't realize how unique and special it is!). We enjoyed playing on the lake day in and day out, but it just didn't seem like our "forever home". With lots of prayer from family and friends, we decided to come home.
Since we've moved back, Dylan has started working at his family's business, Wick's Pies, a 70 year old company that makes more than 1900 pies an hour. More on that, later! I've continued to work with my clients remotely in Florida (YAY!), and we've been able to settle in to Bloomington with our one year old cavapoo, Penny.
I guess what I'm telling you is God is good. But seriously, His plan for us to be in Indiana was SO much better than we thought! We've been able to spend time with our families, attend weddings, graduations, and bbq's that we would have missed if were in in Florida. We've enjoyed watching the seasons change. We were able to reconnect with old friends and meet new ones.
Speaking of new friends... I recently met my friend Allison on a couples retreat in Hawaii (nothing like the movie, I promise). She is an amazing macrame artist, as well as a super sweet, god-centered woman with a passion for simple, local living. I had the opportunity to work with Allison on updating her logo and branding, and I was inspired by her simple-living concept. Working by hand, Allison creates every piece to-order – no two pieces are alike. This is the true essence of hand-crafted, after all!
I also have a custom-made macrame headboard thanks to her! We absolutely LOVE it! It is something we will treasure for years to come, and we can't thank Allison enough!


To shop more of Allison's handmade wall hangings, visit her online at TheWov.etsy.com
Monday, June 30, 2014
News & Blues!

Long time no read, I know, I know. It's been embarrassingly long since I've posted, but we have had a lot of changes happening! For one, we moved from sunny Florida back north to Indiana, home of the Hoosiers, corn hole, and sugar cream pie. We wanted to be closer to our family and friends, and secondly, my husband is starting a new job with his family's 70 year old pie company, Wick's Pies.
One week prior to our big move (I mean, BIG move), my girlfriend asked if I would like to go blueberry picking. It was the end of the season, so we could take as many berries as we wanted! I came home with about 25 pounds of these babies and one week to use them...grrrreat.
I called my Grandma Quiring for some canning tips, because, of course, I had never canned a thing in my life. With the clock ticking, I decided to give canning a whirl. Blueberry pie filling it was! A pot of blueberries, some water, sugar, lemon juice/rind, and corn starch is all it took! Brought the mixture to a simmer, boiled the jars & lids, and filled everything while it was piping hot. I ended up with about 7 Ball jars of pie filling, and 2 of the remaining juice/syrup (which is great on yogurt, as seen above).
3 weeks post-move, I opened a few cans of filling and made a quick pie using our family's raw pie crusts. Call me Sandra Lee here, but this semi-homeade pie turned out to be one of the easiest and prettiest pies I've ever made!

Blueberry Pie Filling (for canning)
Ingredients
- 3 quarts fresh blueberries
- 4 cups water
- 2.5 cups sugar
- Lemon juice from 3 lemons + Rind from 1
- 6 heaping TBS cornstarch
Tools
- 2 large stockpots (one for the filling, one for sanitizing the jars/lids
- tongs
- ladel
- oven mits (or dishtowels)
- ball jars (about 10) with sealers and metal screw bands
Before you start, run all the jars, sealers, and metal bands through the dishwasher with no detergent to sanitize.
Bring one large stockpot of water to boil.
In the meantime, place blueberries, 2 cups water, sugar, lemon juice and rind into another large pot. Mix 2 cups hot water with cornstarch and stir until dissolved. Add to the blueberry mixture. Bring to a simmer.
While the blueberry mixture comes to a simmer, place one jar and one sealer and one metal screw band into the boiling water. Let sit in boiling water for 30 seconds.
Working quickly, carefully pull out the glass jar with tongs, empty any water left in it. Fill the hot jar with hot blueberry filling (using ladle); fill right to the top so there is no space between the lid and the liquid. Place the sealer lid on and screw the metal band closed. Do not close the lid too tight; just to where it stops (about 90% closed...according to Grandma!). Set aside on the counter and let cool.
You will hear the seals "pop" quite loudly, within 10-20 minutes or so. You should also be able to see the lids dip down towards the liquid. If you notice one has not sealed properly, place in the fridge and use within 3-5 days or so. I had one that did not seal...it happens!
Keep in mind that you want to work quickly as the blueberries will soften within 5-7 minutes of simmering. After your first jar, the rest will be easier. Don't overthink it, it's very easy!
Cheers to summer!
Wednesday, January 8, 2014
Resolutions, Schmesolutions
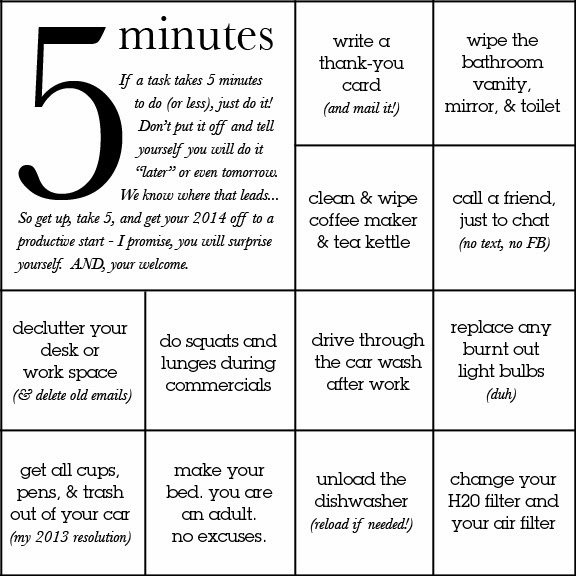
It seems like such a simple rule in theory, and it has taken a few days to get used to, but, I can already see a difference in the number of tasks I am checking off my list each day. It has helped keep the house a lot cleaner AND more organized, which in turn, makes me less stressed out. Boom.
As you can see, lots of these are cleaning/organization related, but not all. A few squats and lunges during commercials can add up to 15-20 minutes in no time – hello, toned tushie! And changing filters, although it seems obvious, does need to be done! So what other 5 minutes tasks are you needing to finish up today? As in, RIGHT NOW?
xoxo
Friday, December 13, 2013
Work Lately...


With all the work that has been coming down the pipeline, I haven't had a chance to sit down and write a proper blog about all the fancy peppermint bark I'd like to taste and all the DIY gifts I'd like to try…if I had time. That said, I am feeling pretty blessed to be able to work from home and do what I love!
Above is a tiny snapshot of some day-to-day projects that I've had a chance to tinker with. Lots of print and web work, creative directing on the LP spring 2014 shoot & catalog, Fall 2013 catalog, Clever Training office posters & flyers, and quick insurance ad that came through today!
On another note…I am going to be an AUNTIE! My sister is due at the beginning of March, and I am absolutely thrilled for her. We are having a little baby shower after Christmas. Below is the invite ;)

Happy Friday!
Friday, November 29, 2013
Mantel Mania!

'Tis the season! Hope all your wildest Black Friday dreams are coming true as you venture into the abyss (aka the mall). I, on the other hand, am happy staying home today to put up some Christmas decorations because, after all, it is simply uncouth to put them up any sooner than Black Friday.
My makeshift mantel seemed like the most obvious place to start, and behold, we have the above photo! I usually have a stack of photos and prints layered in multiple frames on our shelf. Nixed 'em. I replaced one frame with a piece of Kraft paper with a little holiday cheer written on it. Next, I added a wreath, some candlesticks, and I filled hurricanes with ornaments and beads. A little extra green garland fills in the blanks along with a few extra ornaments scattered throughout.
PLUS, our big red surfboard actually seems to fit right in. Never mind the 4 wakeboards to the left of our shelf…conveniently cropped out of the photo, of course…as well as the 3 bikes that seem to only fit in the living room of all places.
SO, there you have it folks. Our cozy apartment seems more festive than ever this year. Maybe it's that the weather if finally cooling off. Maybe it is that I am more at peace with our life than in years past. Dylan and I just had our two year anniversary this month. I cannot believe how far we have come in two years! New careers, new home, new friends, new adventures!
Stay tuned for more holiday cheer!
Friday, October 18, 2013

Monday, September 23, 2013
Crafty

It's officially fall, let the crafting begin! 'Tis the season of pretty trees, comfy flannel shirts, and, of course, crafting with friends! A few gals and I got together this weekend for a wreath-making bash, which, I must say, was surprisingly successful. (Oh yeah, it helps when one of your friends works at Joann Fabrics...and knows everything about everything in the craft world. SCORE!)
I went with some felt flowers, which were super easy to make, and added a few hints of faux berries. All of these rosettes were made from about 6 sheets of felt (I bought 12...just in case!). The bow was made with some scrap muslin that I tore into a long strip. All in all, this project cost a whopping $13 (thanks to all my Michael's coupons)!

Helpful hints:
-a hot-glue gun is a must for this project. Mine is the "high heat" mini gun from WalMart.
-use nice fabric scissors for cutting felt (makes detailed cutting SO much easier).
-be sure to bring champagne to share with friends, it lightens up the mood for all the OCD crafters...myself included in this category!
Cheers to craft season: may all your Pinterest DIY fantasies come true!
Wednesday, August 21, 2013
Smooth(ie)

Lately, I've been in a healthy-food rut. And by rut, I mean, I don't feel like eating anything remotely good for me. Generally speaking, I stay away from fast food, breads and pastas, and only eat sweets on occasion, however, life gets busy and sometimes you JUST. WANT. THE PASTA.
There. I said it. Now, moving on.
I made this delicious berry and banana smoothie for breakfast, and I am happy to say, I thoroughly enjoyed it. Plus, it falls into the "healthy" category. Yay me. So, will it cancel out the handfuls of semi-sweet chocolate morsels I devoured while watching MasterChef last night? Nay, nay. But it's a good start!
Thursday, August 15, 2013
Tingly Toes

My feet have taken quite a beating this summer between wearing flip flops non-stop, running around the yard barefoot, and spending time in the pool. On top of it all, I am prone to dry, cracked, calloused heels...but who isn't?
That said, I decided to spend a little time getting my tootsies back to a (semi) normal state with a very popular foot soak recipe found on Pinterest. Now, I should warn you before I say anything else – the blue Listerine may or may not turn your feet blue. Mine definitely turned blue, but I scrubbed it all away with the pumice stone. That said, you have been warned...
SO, what is the magical foot soak recipe? Listerine, vinegar (apple cider or white), and hot water. Let the tingly concoction work it's magic for 15-30 minutes, then scrub away the nasties. I kept my tea kettle next to me and added more hot water to the mix every 5 minutes or so.
Afterwards, my feet were baby-soft, aqua blue (right on trend...right?), and super tingly all night. This DIY is definitely a keeper. Now, if I could just get the rest of my projects to go as smoothly as this one...
xoxo,
Mitz
Subscribe to:
Posts (Atom)